Posts

Featured Post

Gone ADV

Image
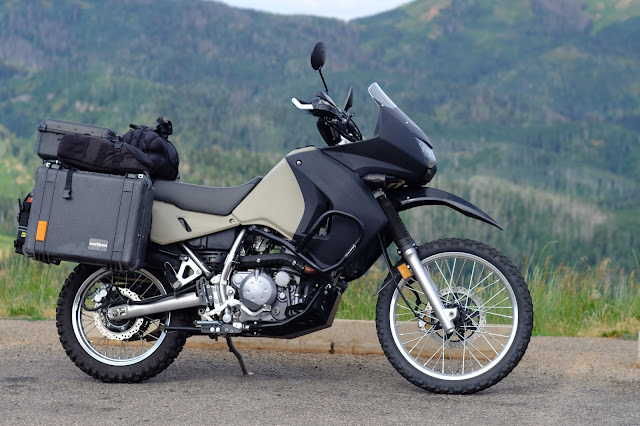
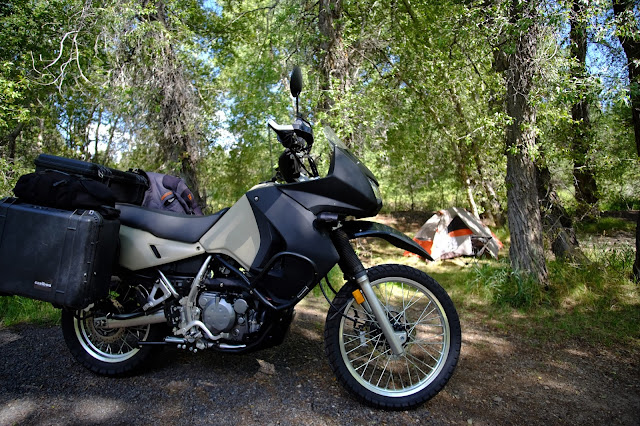
There's been a motorcycle shaped hole in my life ever since I sold the Blackbird three years ago. It was the last of a string of Hondas, starting with a CL 175, a Nighthawk 450, a CB 750 Custom, a Valkyrie Interstate,  and the CBR1100XX Super Blackbird. I gave up the Blackbird after I snapped off my right biceps tendon, which happened about a year after I snapped off the left one. After ten years of ownership, the Bird was spending more time in the garage than on the road while I was recovering, and somehow I came under the spell of some crazy notion that I was done with motorcycles. So I turned my attention to overlanding. Built a Montero, and an H3 and have been enjoying the adventure ever since. But at 14mpg in the little Hummer, adventuring on my own was overkill and having it as my daily driver was gouging the budget, so about six months ago I started my research on ADVenture motorcycles. Think The Long Way Around. The search was narrowed by a lo

Current Set-up

Image

License Plate Illuminate

Image
I bought this KLR with the plate relocated from the sub-fender to beneath the tail light, but there wasn't a plate light. I picked up a pair of LED license plate bolts and wired them into the existing circuit for the stock lamp using the harness off of the sub-fender with the factory connector.

Blue Sea ST Fuse Box

Image
I added a Blue Sea ST four-circuit blade fuse block along with a five-gang common bus to handle the 12V/5V outlet, the Trail Tech Equinox Lamps and the additional 12V outlet I'll install before winter. The Blue Sea box is small enough to tuck under what little room is beneath the seat, but, like the battery and stock fuse block, it's still be at the highest point possible on the bike. The box has a clear plastic cover protecting all the circuits. It's powered directly from the positive battery terminal.  The common bus is pulled from the NEG post. I like a separate common to bring all the accessory leads to. Makes trouble shooting easier. I've done a similar set-up on my H3 with a 100A breaker in between the  Blue Sea box and the battery.

Progressive 465 Series Monotube Shock

Image
The original plan was to swap out the stock spring and go with a Top Gun 8kg spring upgrade to handle the load. That all changed when a) thinking all along that the adjustable stock spring was at its highest setting, but was in fact bottomed out with a broken pre-load adjuster, and b) when I tried to compress the Top Gun shock with a set of Tusk spring compressors for the install. This is what FUBAR looks like. I figured if the pre-load was busted at its highest setting - 5 - I could live with that being a fixed value, as long as the Top Gun spring compensated that stock spring's shortcomings. But, the Tusk compressors slipped because I didn't tape the spring where they mounted, and because there was no way in bloody hell they were going to compress that spring far enough because they weren't long enough to grab enough spring for the compression in the first place. I was leaving the following afternoon for a 900-mile weekend ride. I ordered a Progressive 465 Series

Other Farkles

Image
The rear brake master cylinder is now protected with an SW-Motech guard, the stocks pegs were swapped for a pair of IMS Pro-Series foot pegs, and a new adjustable center stand from Happy Trails will make chain maintenance more of a Zen thing. There's a lift handle added to the other side. Tusk 30mm handlebar risers were added resulting in a surprising difference for me, not only for control off-road when standing but also for long rides, relieving much of the numbing I experienced with the bars in the stock position.  A Wolfman bottle holster has been added to the right Pelican pannier holding an MSR fuel bottle, making oil maintenance easier and freeing up some room in the top case.

Trail Tech Equinox Lights

Image
These lamps added a whopping 1052 lumens to the KLR's illumination, with 10 degree spot angles and adjustable output for each fixture. They burn at 6000 kelvin, making my stock head and high beam look like they belong on an old French scooter. Wanting to avoid any extra holes or hardware, I eliminated the stock turn signals and replaced them with SW-Motech indicators on the hand guards, freeing up the space to mount these lamps. I wanted to maintain the break-away engineering of the stock signal posts but couldn't come up with anything that would be rigid enough to keep the housings from bouncing around, so I put together some hardware that fit perfectly into the turn signal post recess on the fairing. The hardware used includes two stainless 1" fender washers with 3/8" centers, a smaller diameter stainless washer that works as a spacer in between, and a rubber 1" washer to allow adjustment while maintaining tightness. I installed the Trail Tech